The Tracking Submit action automates the process of creating a batch of mail pieces and downloading the cover pages or labels for those pieces.
The process is initiated by dropping a CSV file with piece information into a designated input folder in your local environment. Then, Easy Send Automate generates the cover pages or labels and puts them into a designated output folder. From there, you can easily print your covers pages or labels and prepare your pieces for mailing.
Setup
To set up the Tracking Submit action in Easy Send Automate …
- Click Setup on the homepage.
- Click Add at the top of the Setup page.
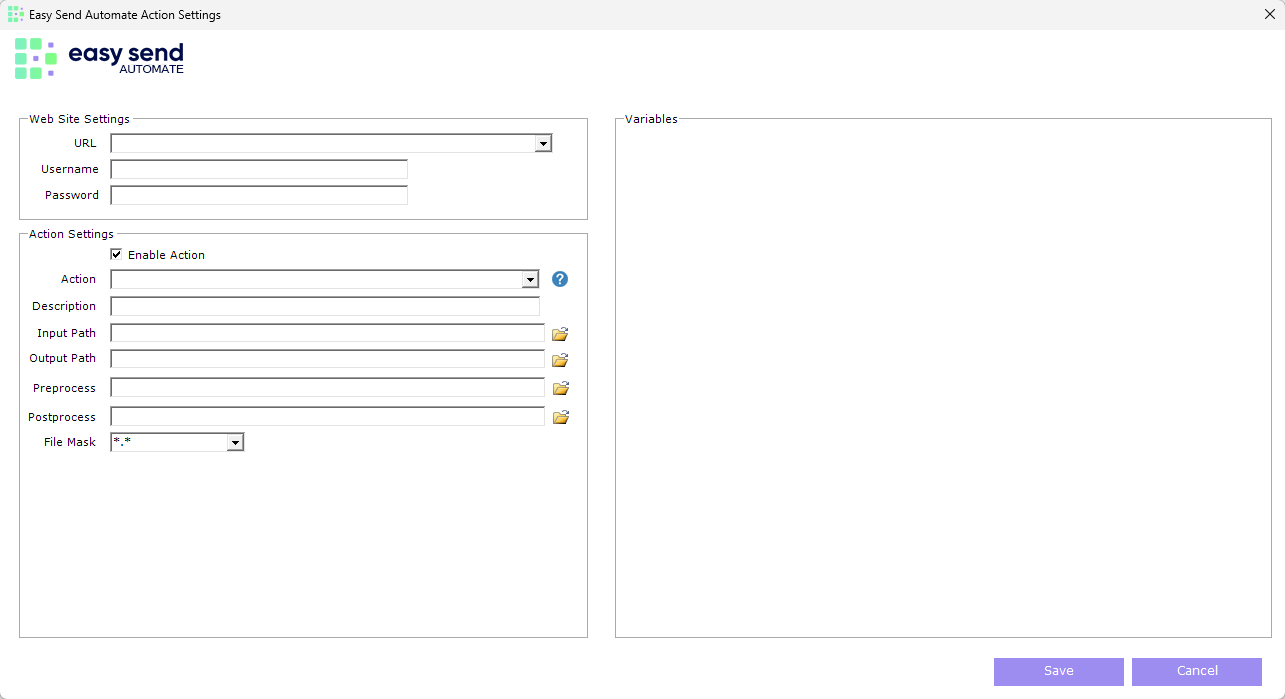
You’ll be brought to the Action Settings page.
Website settings
First, select the URL that contains easysenddigital.com. This represents the production endpoint. The other option in this dropdown represents a test environment and should only be used when troubleshooting with our support team.
Then, within the Easy Send Digital web-app, find your integration credentials. Copy and paste your Integration ID into the Username field and your Integration Key into the Password field. You can see instructions on creating or finding your integration credentials here.
Action settings
Make sure the Enable Action checkbox is checked, then select Easy Send Tracking Submit from the Action dropdown. Once this is selected, you’ll see a few more options appear under the Variables section.
You can choose to add a Description to this action to be able to identify it easier.
Next, select an Input Path. This is the location where you will drop a CSV file with your piece information. Then, select an Output Path. This is the location where Easy Send Automate will put the generated cover pages or labels.
The Preprocess and Postprocess fields are optional fields that allow you to upload a VB script file. For Preprocess, the script will run before each cover page is created. For Postprocess, the script will run after each cover page is created. The script you upload allows you to automate any kind of processing you’d like to execute for each file.
Finally, the File Mask field allows you to restrict which files in your input folder Easy Send Automate will process. The default (*.*) means any file name of any type will be allowed to be processed. Here are a couple examples of file masks you can apply:
- *.csv (this will restrict Easy Send Automate to only try to process files that end with “.csv”)
- file_name.* (this will restrict Easy Send Automate to only try to process files that have the name “file_name”)
Variables
In the Mailing Profile field, enter the name of the mailing profile you’d like Easy Send Automate to use to create pieces. Mailing profiles are configured within the Easy Send Digital web-app. They define some basic information about the mail pieces you will create. For example, the mailing profile determines the USPS services that will be included, the type of envelope that will be used, and the return address that will be used.
Next, check the boxes for the items you would like created for your mail pieces. Your options include …
- Banner Page – A PDF file of the cover page or label you’ve configured in your selected mailing profile
- Tracking Image – A PDF file that contains only the barcode and the tracking number
- Meta Data – XML metadata about the piece
- USPS Documents – PS Form 3877, PS Form 5630, and PS Form 3152
Select Continue on Error if you’d like Easy Send Automate to continue the process of creating pieces even after an error occurs for any given piece. Leaving this unchecked will mean that Easy Send Automate will stop processing pieces when an error occurs.
Finally, enter your email address in the Email field if you’d like to receive notifications about the automated piece creation process. The two checkboxes below allow you to select which notifications you’d like to receive.
- Send Success Email notifies you when your file has been successfully processed.
- Send Failed Email notifies you when the piece creation process has failed.
Once you’re done, click Save, and your action will be created. You are now set up to start creating pieces with Easy Send Automate.
Creating pieces
1. Prepare your file
First, prepare a file with your piece information and export it as a CSV. Click here to download a sample file with the appropriate column headings and some sample data. The following columns are required:
- name1
- street1
- city
- state
- zipcode
- weight or pagecount
If using the weight column, enter the total weight of the piece in ounces. If using the pagecount column, enter the number of physical pages that will go in the envelope.
2. Drop your file
Next, drop your CSV file into your designated input folder.
3. Retrieve documents
Once the process is finished, your file will disappear from the input folder, and your selected documents along with your source file will appear in your designated output folder.
